Friday, May 14, 2010

Just Call Me "Omar The Tentmaker" - Manly Sewing Project #3

Okay, I didn't actually make a tent, though I might tackle some sort of lightweight tarp-type shelter someday like a zillion other outdoor enthusiasts who seem to think they've found some magical new configuration of ripstop nylon and a few poles which they proceed to hawk on eBay or in the monthly Boy Scout magazine that shows up at my door.

No, Manly Sewing Project #3 was not a tent, but it was a cover for my outdoor grill!  I sure felt like Omar the Tentmaker as I had to repeatedly cram nearly five yards of heavy fabric under the head of the sewing machine.

I can hear you saying "But Eric, you could have just bought a grill cover from any number of stores and for pretty cheap as well and without all that work!"  And you'd be mostly right, except that not all grill covers are made equal!  I tried to go buy one before I decided to make one and it went something like this:

  1. Go to Academy Sports and search for grill covers
  2. Find cheap grill cover for $7 that appears to be make of recycled plastic shopping bags thinly pressed and heat fused together at the seams.  I'm pretty sure this won't even make it onto the grill once without tearing somewhere
  3. Find slightly more expensive grill cover for $13 that has the same construction as the $7 one except that it has a backing sort of like quilt batting but much thinner and more cobweb-ish.  This one might survive the first use but I wouldn't trust it past about three uses.
  4. Give up at Academy and go to Wal-Mart
  5. Find NOTHING at Wal-Mart
  6. Refuse to go to Sears because that place really bugs me
  7. Refuse to go to some specialty grill store because I'm pretty sure it's far away and I'm absolutely positive that if they have anything better than Academy it will be obnoxiously overpriced
  8. Go home in frustration and look online
  9. Find better quality grill covers on eBay and online stores, but they're not an exact fit for my grill and they're about $80 or more.  Since I only paid $170 for the grill there was no way I was going to spend more than half of that just for a cover.
  10. Give up and decide to make my own.
Any why not?  I have an industrial walking foot upholstery sewing machine.  I'm married to a master seamstress who can free-hand wedding dress patterns in her mind's eye.  I'm pretty sure I can buy much better fabrics than even the expensive covers are made of.  I'm even pretty sure I can make it for cheaper (I firmly believe you don't have to count the cost of your time if it's a hobby you enjoy).  Best of all I can make it just how I want it!

I trolled eBay for fabric and finally settled on 5 yds 600D Polyduck canvas.  It's basically a 600D polyester canvas with a thin sheet of PVC bonded to the back.  Polyester has great UV resistance for outdoor use and in theory the PVC backing will make the fabric waterproof.  Unless you seal the seams the finished article won't be truly waterproof, but I'm not really concerned.  I just didn't want the grill "catch trays" filling up with water, and mostly I wanted to keep the dirt, dust, pollen, etc. off the grill.

I also got some killer deals on big rolls of 2" nylon webbing, 1" grosgrain ribbon for binding, and 2" velcro.  Actually, I bought a LOT of webbing and ribbon.  Like 200 yards of each!  I couldn't help myself, it was CRAZY cheap and I knew it would get used for other projects I had in mind.  Sarah looked at the giant rolls of webbing and ribbon with one raised eyebrow, and commented that it was a lot of material.  But to her credit she didn't actually ask me if I'd lost my mind, God bless her.

Sarah helped me figure out a pattern of sorts.  We draped the entire sheet of 60" wide fabric over the grill and determined that the front-top-back could be one big piece and we'd need two smaller pieces for the sides.  I cut out the the big piece and we draped it over the grill again, measuring the dimensions/shape we would need for the side pieces.  We could have gone with a design that was much more form-fitting but that would've been way more complicated and I doubt it would have improved the utility in any way.  With all three pieces cut out it was as simple as pinning everything together, sewing the seams with the grosgrain ribbon on one side, then laying the seam flat and stitching over the grosgrain ribbon for a nice flat finished seam.  The size 92 Kevlar thread I bought earlier worked great.  I also installed two handles in the top seams to make it easier  to lift off, and put a velcro webbing strap at each corner so you can gather up and secure the bottom of the cover.  Hopefully it will keep stormy weather from pulling the cover off.

Best of all, the total cost to make this was about $25-30, and I'm sure it's better quality than any of the ones I found online for 3-4 times the price.

With Sarah's patient help I also learned a lot of really useful things.  I suppose I might have been able to get the job done without her help, but it probably would've taken way longer and almost certainly wouldn't have looked as good.  Thanks Sarah!

I am MAN, watch me SEW!

No, wait! I meant:

I am MAN, watch me GRILL!
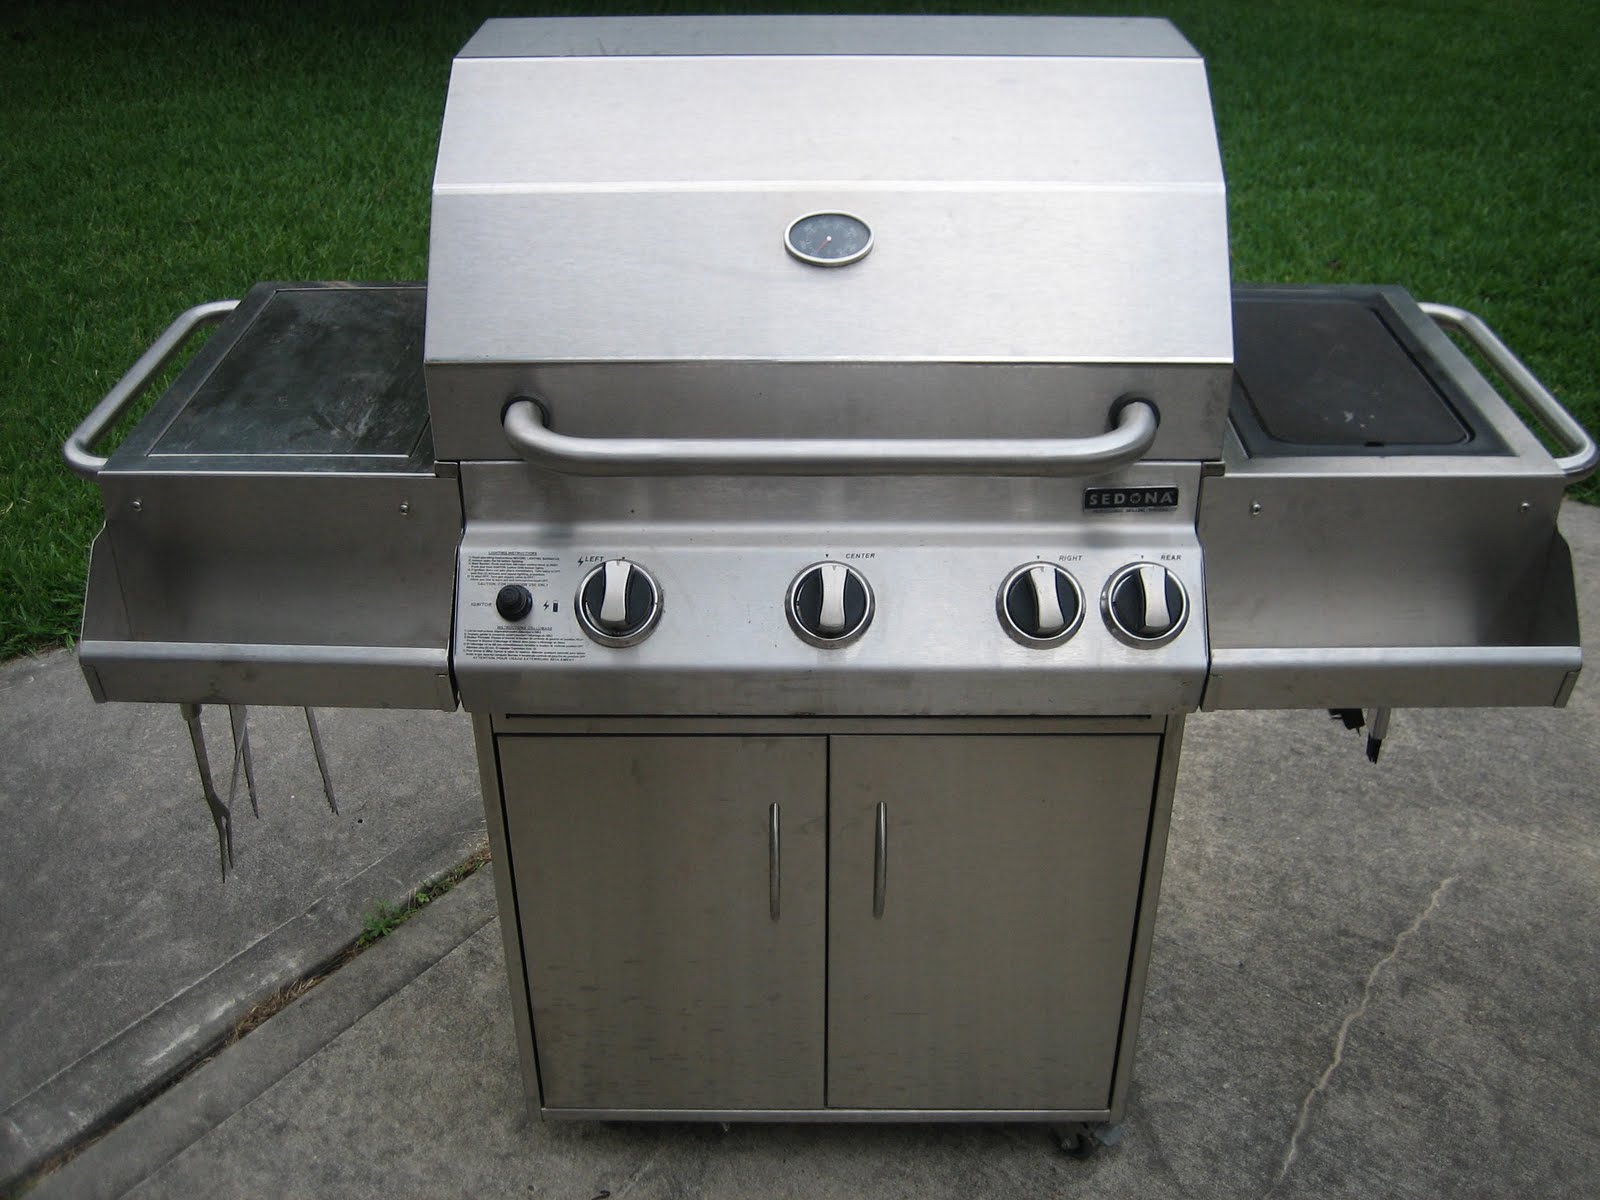

My bargain Craigslist find.  New cost about $600, I paid $170 used.  100% stainless steel frame, trays, burners, EVERYTHING!  Truly a metallurgists grill.


The finished grill cover.  I decided I wanted it loose enough that it wouldn't be a fight to get it on/off and so I could get at the tank/storage area underneath just by lifting up the bottom edge of the cover rather than removing it completely.


Handles on top for easier removal.  A length of small diameter vinyl hose was sewn into the handle to give it some bulk, shape and stiffness.


Bottom gathered up with velcro straps


Velcro straps on the back side as well


Sunday, May 2, 2010

An Ode to Chaco Sandals. Farewell, Fallen Friends...

After nearly 11 years of faithful  and trouble-free service, I finally threw out my old Chaco sandals.  The soles were worn through and the straps were starting to get pretty frayed in some spots.  Here they are moments before I tossed them in the big trash can outside.


So why is this worthy of a post?  Mostly because I was sad to see them go and I thought an online memorial service of sorts would ease the pain of their passing.  You see, I wore these things EVERYWHERE I possibly could for the last 11 years.  Well, except for 2 years while I was a missionary in England, but still, that's a long time!  Even when I lived back in Canada I wore them as long as the snow didn't cover the tops of my toes, which was usually from late April until mid October.  I've done yard work in them, forded streams in them, gone boating in them, hiked through Japser and Banff in them, walked miles around Paris and through the catacombs in them, and just plain sat around the house in them.  Like green grass and mosquitoes, the appearance of the famous Chaco zig-zag tan lines on my feet, like a solar mark of Zorro, were a sure sign that summer was in full swing.  They fit me almost as well as my own skin and never gave me a moments trouble.  They have become the standard by which I will judge all other footwear until such time as some other pair of shoes manages to last longer, trouble free, in perfect comfort, and with the same degree of utility (all of which is doubtful).  I thought I lost them once when we moved to Calgary for the summer and I was forced to buy an inferior pair of Nike sandals but they turned up when we moved again and we were reunited.  Throwing them out today was almost an emotional occasion.  I felt like I was betraying an old friend, like the kid who had to shoot Old Yeller.  I really wanted to keep them for their nostalgic value, but I kept thinking of those mentally ill "hoarders" on TV clutching bags of trash while brave interventionists try in vain to reason with them.  I suppose keeping on old pair of shoes doesn't guarantee I'll wind up a hoarder, but that's the trouble with slippery slopes.  They're slopes, not cliffs and they usually start off with the gentlest of declines.  Oh, and they're slippery.  Sorry, getting off track here...

My father thought I was crazy paying $105 (plus 7% GST, thanks much Mr. Mulroney)  for my Chacos back in 1999.  He gave me the same look he gave me when I told him I wanted a North Face backpack for school after destroying 2 cheap ones in 3 months.  I had to pay for it myself since it cost 3X as much, but it survived 6 years of abuse through high school, some university and summer construction jobs.  During a recent visit to see the grandkids, my father admitted he never thought my Chacos would turn out to be such a good value and wondered where he could get a pair.  It was a victory so small and quiet as to almost go
unnoticed, but a victory nonetheless.

I've already bought a new pair of Chaco sandals, and yes I suppose I'll have the chance to make some memories in them just like the last pair, but therein lies another sad story.  You see, my old Chaco's  were proudly made in Peoria Colorado in a small factory where craftsmanship and service were evident.  You could send your old Chacos back to the factory and they'd resole or otherwise repair them as needed.  Well, when I was shopping for a replacement pair, I discovered to my shock and dismay that since 2009 all Chacos were now produced in China like everything else.  The company's general manager said the decision was made to move to China because they can be produced cheaper, they have fewer defect rates, and the Peoria factory just didn't have the machinery capable of producing future designs.  Somewhere else I read that the savings per pair was only about $7, but maybe that's not true.  If in fact the move to China was necessary for the survival of Chaco sandals, then I guess I'm grateful, but it's a hollow sort of gratitude.  I'm not American, but there was something nice about buying a product that was made here.  Yeah, I'm sure their materials were purchased from overseas and it pretty much came down to assembly only in the Peoria factory, but it was something anyway.

I won't go into an anti-China rant or anything like that because I believe it's every consumer's fault that the vast majority of our consumer goods are made in China.  At some point, or perhaps gradually, North Americans decided they didn't want mundane factory jobs, but still wanted to buy stuff for cheap.  I guess that's why American universities have an abundance of useless degree programs filled with students who would be better served by good trade schools and it's also why the Chinese make all our stuff.  It's not like the Chinese held a firecracker to our collective heads and forced us to move production there.  We wanted more for less, and the Chinese provided it.  I shudder to think what will happen when the Chinese (and India, Taiwan, etc.) decide THEY want to be educated and have a higher standard of living.  Who will make cheap crap and shiny things for white trash?  When they don't have any competition, what's to stop them from raising their prices to raise their own standard of living?  And rightly so I suppose.  But I digress...

My new Chinese-made Chaco sandals look pretty much like the old ones.  I got black straps this time.  The footbed is a little thicker, the outsole tread is a little more aggressive and the straps are a little wider, but they're unmistakably Chacos.  Construction and materials look pretty much the same, so I guess I can hope they'll last as long as the old pair.  I'm disappointed to report that they still cost the same as when they were made in America, about $100.  Whatever savings were realized by moving to Chinese production certainly aren't being passed onto the consumer.  I hope you sleep poorly at night on a lumpy pile of filthy cash Mark Paigen, founder of Chaco.  As for me, I guess I'll march on, as it were, with new sandals that doubtless are functionally adequate if not special.  

So farewell American Chacos, you were one of a kind.  I'll try not to think of your slowly decaying soles lying at the bottom of a heap of common trash in some landfill in Texas.  If by some chance the resurrection of inanimate objects is permitted in the next life, my old American Chacos will be on the short list along with Linkin' Logs, the green blankie I dragged around everywhere as a little kid, and my 1992 Subaru Justy.


Friday, April 30, 2010

Kevlar is Kool! - Manly Sewing Project #2

Remember that half-finished leather project a few posts back?  It was a magazine ("clip") holster for my trusty Smith and Wesson .40 if you couldn't tell, and I finally finished it!

I wasn't happy with how it was turning out so I couldn't decide whether to toss it out or try and finish it.  One of the biggest problems was that I wasn't happy with the tread I used for stitching.  It was just size 69 bonded nylon upholstery thread and I really needed something bigger and (ideally) stronger.  As luck would have it I found some size 92 Kevlar thread on eBay last week and it arrived yesterday.  Kevlar thread is normally used for sewing fire retardant items, and is way too expensive for everyday sewing.  The usual price for a 1 lb cone of size 92 Kevlar thread is about $120.  I got mine for about $15!!!  I have no idea why such a low price, but it was cheaper than buying plain old nylon upholstery thread, so I got 4 spools of black and 2 of brown.  When it arrived, I realized just how much thread 6 lb is!  I flame tested the thread and sure enough it's Kevlar.  It sews and looks much nicer than the other stuff I was using and works great in the Juki walking foot.  My Necchi can handle the Kevlar thread as well but the bobbin side stitches just aren't as tight as they should be no matter what tension settings I use.  It's not really meant for use in home machines, but I figured it was worth a try.

Anyway, I finished sewing the holster, trimmed it to shape, added the belt loop holes, applied dye and top finish, and here it is:


I'm still not thrilled with the stitches.  I clearly need more practice doing tight turns with the machine, but I'm sure it will be perfectly functional even with wonky stitching.  In case you're wondering, I formed the leather over the magazines using a vacuum press.  I bought one of those vacuum presses they sell for making skateboards (no, I don't make skateboards) a while ago for leather work and possibly veneering.  It has a manual pump for now, but I scored a nearly-new free lab-grade vacuum pump awhile back (new cost is approximately $3000) that I think I'll adapt to use with the vacuum press bag.  Not sure when I'll get around to that, but watch for it in a future post I guess..

Sunday, April 25, 2010

First Manly Sewing Project - Tactical Tie-Down Strap Keeper

Most of us manly men own at least a few tie-down straps.  They're great for strapping down furniture on the roof of your Honda Civic, holding up dilapidated sections of fence in the back yard (you fixed the front yard fence properly, right?), "clamping" broken stuff together while the glue dries, hanging kayaks from the ceiling of the garage, or "securing" your car's trunk lid partly shut while you transport thirty-seven 8' two by fours home to make that crappy shelf you promised you'd build months ago.  Their utility is only limited by your imagination, kinda like zip-ties or duct tape, but for heavier jobs or jobs where you'd like to wallow in laziness a little longer and are looking for the peace of mind that can only come from a product with an 800lb breaking strength printed right there on the tag.

They come in various sizes and invariably end up in a tangled heap in the garage, your trunk or wherever.  Oh sure, you can neatly roll them up and place them lovingly on a shelf next to your wrenches, but the next time you reach for those wrenches if you so much as brush past one of those rolled up tie-downs it'll promptly unroll itself like it was spring loaded.  This in turn will set off the other three next to it and soon all four are making a dive for the spider infested gap behind the shelf and you end up with a blood-pressure-spiking aneurysm-inducing rats nest of multicolored nylon webbing with a few hooks and ratcheting mechanisms hopelessly trapped in the melee.  If you're particular about that sort of thing you'll probably stop what you're doing and dedicate 5 minutes to untangling it all and making everything pretty again.  If you're like me, you'll leave the mess and fix it later when you actually need a tie-down strap.  I suppose that's not what a good steward would do, but if I died that same hour I'd hate to think I spent 5 of my last 60 minutes on earth fussing over some straps I'd never use again.  Super lame...

So rather than risk a lame surprise ending to life, I decided to make a simple pouch for securely holding four rolled-up 1" tie-down straps.  It's made of black ballistic nylon, webbing and velcro and looks like it'd be at home on a tactical vest, so I decided it's a "tactical tie-down strap keeper."  I'm sure the US Infantry has a Light Armored Temporary Fixers Brigade somewhere who'd love this thing.

Best of all, it was my chance to test out the new (old) Necchi BU Mira sewing machine I recently bought.  Once I figured out the right tension settings and zig zag stitch length to use with the size 69 upholstery thread, it worked fairly well and happily plowed through 4 layers of 1050D ballistic nylon with no problem.


Sunday, April 18, 2010

The Japanese Workhorse and the Vintage Italian


Based on the title, I betcha didn't think this post would be about sewing machines, huh? If you're not disappointed, read on...

A while back I started learning about sewing machines. Why? I don't remember exactly, although I think it's at least in part because I've done leathercraft for years, making small fitted cases for knives, camping gear, etc. and I always stitched by hand, which sucks, so I wanted a machine that would sew heavier leather. Minor problem: a sewing machine for stitching heavy harness leather costs about $2500-4000+. Good news: I don't typically sew leather THAT heavy, so it turns out an industrial walking-foot upholstery machine will do most of what I need. New problem: industrial walking-foot sewing machines cost $1800 new, $900 used. Lucky find: a Craigslist classified ad for an unidentified Japanese-made Juki industrial sewing machine for $200. Although the picture in the ad was pretty crappy, I could tell from the paint scheme that the machine was not ridiculously old, and if I squinted just right I thought I saw a walking foot. I decided to go for it.

Turns out it's was for sale at some junk "emporium" south of Houston so I jumped in the Jeep, utility trailer in tow, and raced down to this place to have a look. Sure enough, it was a walking-foot upholstery machine that the guy purchased as part of a warehouse lot at auction. It had a few paint chips and some surface rust on a few exterior bits, but the insides were nice and oily with no signs of rust. I could see it would need cleaning/servicing and a few minor parts, but everything turned freely and the motor even ran. Sold! Good thing I moved quick because apparently there were three other people who also said they were coming right away to pick it up. There's something satisfying about literally racing to get a bargain.

Long story short I got it serviced, replaced the old clutch motor with a DC servo motor for better speed control, repainted the stand, and it works like a charm! If you can fit it under the foot, it will sew it, all day long. Truly a Japanese workhorse. Here's a few shots:


Behold the mighty walking foot:


Here's an example of what it will sew (it's clearly not finished but you get the idea):


There's only one problem with the Juki: it's a straight stitch only. Now admittedly, a straight stitch is all you ever need for sewing heavy leather, but I started to envision making other cool things like gear bags and camping stuff, out of heavy fabrics like ballistic nylon, canvas, tarps and seat belt webbing, and a zig-zag stitch is a must for that kind of work. I had no room for an industrial zig-zag and didn't really need one anyway, but I knew I'd need something with a little more grunt than Sarah's Bernina.

So I started trolling through vintage sewing machine forums and learned all kinds of cool stuff about sewing machines from days gone by. One machine in particular sounded just right for the job I had in mind. Enter the Vintage Italian: a 1950's Necchi BU "Mira". By all accounts the Italian-made Necchi BU Mira was a marvel of engineering and while not an industrial machine it could handle heavy stitching tasks that most home machines would balk at these days. Best of all, it has all steel components machined with nice tight tolerances and a healthy 1.1 amp motor. No plastic gears or internal timing belts to break. So I started keeping an eye out for one on Craigslist. It didn't take too long (sometimes it's handy living near a city of 4 million people!) before I found one that looked to be in decent shape and appeared to be in the original cabinet as well. I took a trip into Houston to check it out and it looked well worth the $80 asking price, so I took it home and started to clean it up, scrubbing years of old yellowed oil and grease off everything. I had to replace the old dried-out bobbin winder tire and un-seize the handwheel so the bobbin winder would work. The motor was in good shape, but all the wiring had deteriorated and had to be replaced. I converted the motor controller from a knee type to a foot type and replaced the 55 year-old belt with a new nylon cogged one. With a good oiling she runs as smooth and quiet as I imagine she ever did. Even the timing was still set correctly. Here's a few shots:

The cabinet has some dings and scratches but is fully functional:


Maybe you're not into the avocado green color and chrome but I think it's cool. The machine is nice and simple to operate too. There are three levers for needle position, stitch width, and stitch length. That weird contraption hanging off the front is a "Wonder Wheel" that can be connected to the needle position and stitch width levers to produce decorative stitches.


Why is it called the "Mira?" I dunno, but I guess it's as good a name as any for a hard-working Italian girl.


All steel, no plastic or belts!


Singer class 15 bobbin/hook. The green lever drops the feed dogs for embroidery/darning.


The other really cool thing was that the cabinet came crammed full of stuff! Extra bits and pieces for the machine, an automatic buttonholer, vintage sewing patterns, a tin full of buttons, and the original paperwork:


Apparently, a Mrs. Williams bought the machine in 1955 for the sum of $393!!! She traded in an old machine, put a little money down, and made payments of $10.62 a month for the next 2 years. I went to an online inflation calculator ( http://www.westegg.com/inflation/ ) and found out that the purchase price of $393 in 1955 is like $3113.62 in 2009 dollars based on the Consumer Price Index. Crazy huh?


I haven't decided what my first project will be with this machine, but probably firewood totes or a barbeque cover.

Oh, and if any of you were thinking of calling me some kind of sissy for being into sewing machines, I'll refer you to the chainsaw post of 2009...


Sunday, May 10, 2009

Hooray for Hurricanes and Chainsaws!

I'm still pretty new to Texas, the Gulf Coast and hurricanes, but I gotta say that I thoroughly enjoyed the last hurricane season. I'm not trying to make light of the devastation experienced by many, but for me the highlights go something like this:
  1. Got a one week holiday since the office was closed and I had no power or phone.
  2. Got to cook outdoors in dutch ovens. It was like camping! Since we had a lot of time to cook, we ate better than some weeks when we did have power.
  3. Got to roam around the neighborhood helping random people cut up trees, clean yards, etc. The sense of community was awesome and I met a lot of nice people.
  4. Cooked and ate a lot of meat since there was no power for the freezer. So did everyone else. It was like a huge BBQ block party at times.
  5. Chevron gave us a good generator and some other gear that we got to keep.
  6. Insurance gave us a nice chunk of change to rebuild the fence and make some minor drywall repairs due to water leaks. I did the work myself for a fraction of the cost and used the rest of the money to buy tools and TVs!
  7. Insurance also bought us a new roof ($15,000!) which the house was going to need soon anyway.
  8. It was a good excuse to buy a chainsaw and a trailer so I'd be prepared to help out with service projects and cleanup for next hurricane season.
Point #8 brings us to the real subject of today: Chainsaws. Chainsaws are right up there with guns, barbeque and demolition derby when it comes to truly manly redneck pursuits. I find them intoxicating, really. And after attending a few church-organized cleanup parties to cut up the enormous oak and pine trees that seem to mysteriously blow over after 60+ years of commendable service, I realized that some cheapie little tree-trimming Homelite saw just would not do. I needed a real saw. Dare I say, a manly man's saw?

Let me pause here to mention that I inherited a lot of traits from my father including an analytical mind, the ability to work with my hands, the desire to fix my own stuff whenever I can, and a propensity to sweat profusely at the slightest exertion. But he'll probably to be the first to suggest that I didn't particularly inherit his keen sense of spendthrift or tendency to purchase tools that are just good enough for the occasional home handyman task. Don't get me wrong here. I think that moderation certainly has it's place, but mostly for things like exercise, jury duty, dancing in public, changing poopy diapers, and consuming soy-based food products other than soy sauce. So when I decided to buy a chainsaw, I knew it wasn't going to be small, and it probably wasn't going to be cheap. But it would be well made, reliable, and of course very manly.

Those who know me well know that I'm a bit of a freak when it comes to researching products I'm considering purchasing, especially if they cost more than $50. I spent hours online searching websites and forums and finally decided to buy a Dolmar chainsaw (http://www.dolmarpowerproducts.com/). If anyone reading this knows something about chainsaws you might think "wonder why he didn't get a Husqvarna or a Stihl?" If you want details, send me your email and I'll tell you all about it, but suffice to say I was impressed with the power, weight, reliability and rave reviews from professional users. Plus I always get a little extra thrill out of finding a great product that is perhaps not well known. In the pictures you'll see below, you'll notice that the saw says "Makita" on it and is unmistakably Makita blue and grey, not Dolmar red and black. That's because Makita bought out Dolmar some time ago and at the Dolmar factory in Germany they paint some blue and some red, but rest assured they're all Dolmar. I bought mine from a Home Depot rental center in Houston. It was the 64cc version with a 20" bar and came with one chain, eight bottles of mix oil and a gallon of bar oil all for $459 if memory serves me. Not content with a mere 64cc and 4.8 horsepower, I ordered a bigger piston and cylinder online for a few hundred more, installed them myself, and brought the saw up to 79cc and 6.3 horsepower. I was able to do this because Dolmar uses the same bottom end for several different sizes of saws that differ only by piston and cylinder. I also added a 24" bar, though I'm pretty sure it could handle up to a 36" bar in a pinch depending on the wood type and if I adjusted the bar oiler to the maximum setting.

Enough with the technical details. The bottom line is I love this saw. It's essentially a small dirt bike engine bolted to a saw chain, and it HOWLS! Give me a sharp chain and in no time I'll lay waste to your mighty forest and leave you with a pile of bucked up logs. As powerful as the saw is, I'm delighted to report that it starts like a dream, it's dead smooth and I can run it for hours continuously without any vibration numbness or fatigue. Truly a joy to use and highly recommended to anyone looking for a professional quality saw. The only real downsides to this saw are the face muscle cramps you'll get from long periods of goofy ear-to-ear grinning, and being pestered by the other manly rednecks who want to know what kind of saw that is and where you got it. If you luck out you may even be able to pick up a slightly used one from a Home Depot rental center when they sell off their rental equipment a few times a year. I've heard of people picking them up for under $200 in good condition.

Anyway, here are some pics from a wood cutting project this weekend:


Here's the biggest of the three oak trees we cut up. This and the other two were blown down during hurricane Ike and had been lying here for months. Finally someone in the Elder's quorum presidency just knocked on the guy's door and asked if he needed help cutting them up. Of course he accepted, so the Mormons swarmed the place on a Saturday and got to work.


The two smaller trees.


The wood pile is growing...

(in caveman voice): Logs HEAVY! Wheelbarrow GOOD!

The mighty Poulan "Wild Thing" had a few troubles that day, but it couldn't keep Brother Eggett from smiling!


Yours truly tackling the base of the biggest tree. That's the 24" bar.


Finishing the back side of the cut. Aaaaaah, the smell of wood chips, two-stroke exhaust and testosterone.


Safety first kids. Here's the close-up shot to show you that I'm wearing wrap-around polycarbonate glasses and custom earplugs. Also I recommend grinning with your mouth shut while sawing. I think I spit out about a half pound of sawdust throughout the event.


The final wood pile. We're coming back for a bonfire when he lights it. I'm pretty sure it'll be melt-your-face hot from a distance of 30 feet.


Here she is. I've dubbed her the Blue Banshee.


This was the fattest chunk of the biggest oak tree. It got that way because of some serious burl growth that you can see in the picture as crazy swirly wood grain and gnarly bumps. I wanted to cut it into slabs and eventually use the wood for some cool woodworking project, but I only got a few slices into it before I discovered that it was rotten in the core and cockroaches of all sizes had made a nest in there and started swarming out of the log. I'm glad none of the other manly men were around to see me freak out like a little girl as I swatted at cockroaches crawling up my neck. I took what wood was usable and pitched the rest. I still managed to harvest a few hundred pounds of nice oak burl wood. I'll stash them in the garage and let them dry out as best they can in the humid Houston weather and figure out what to do with them later.


Until next time, chainsaw careful folks...


Friday, May 1, 2009

Parks and the 9/80 Work Schedule...

What's a 9/80 work scedule?  Well, it means I work 9 hours every Monday -Thursday, 8 hours  on Friday and every other Friday off.  That's why I was able to join the fam on "park day" and get a few pics and videos of the kids.   Check it out: